Find Any Object with SAM3 & Roboflow
A detect anything model finds objects from a plain-language prompt instead of a fixed, pre-trained class list, so you type “forklift” or “pallet” and get bounding boxes back with no labeled data or training. This tutorial builds a warehouse asset search in Roboflow Workflows using SAM3: pass an image and a text prompt, get every matching asset boxed, labeled, and counted, and swap the asset by swapping the prompt.
A detect anything model flips the usual object detection workflow on its head. Instead of collecting images, labeling every asset, and training a model on a fixed set of classes, you describe what you want to find in plain language and the model detects every matching object. Give it a prompt such as “forklift” or “pallet” and it returns the boxes, with no labeled data, model training, or custom code required. When a new asset appears, you just change the prompt.
SAM3 (Segment Anything Model 3) is the detect anything model we’ll put to work today, and warehouse asset tracking is a natural fit. Warehouse workers spend an estimated 30 to 40 percent of their time on non-productive tasks such as searching for misplaced equipment, waiting for assets to become available, and walking between zones without carrying a load. In warehouses running multiple shifts, those lost minutes add up fast. A model that finds any asset on demand, without a training cycle for every new item, turns that search problem into a single text prompt.
In this tutorial, you’ll build that search engine in Roboflow Workflows. By the end, you’ll have a Workflow that takes a warehouse image and a text prompt, then returns every matching asset with bounding boxes and a count.
How It Works: Detect Anything with SAM3 and Roboflow Workflows
The Workflow begins with a warehouse image and a text prompt, such as “pallet” or “forklift.” Both are passed to a SAM3 block, which finds every object matching the prompt. Unlike traditional models trained on fixed classes, SAM3 understands open-ended text, allowing it to detect what you describe.
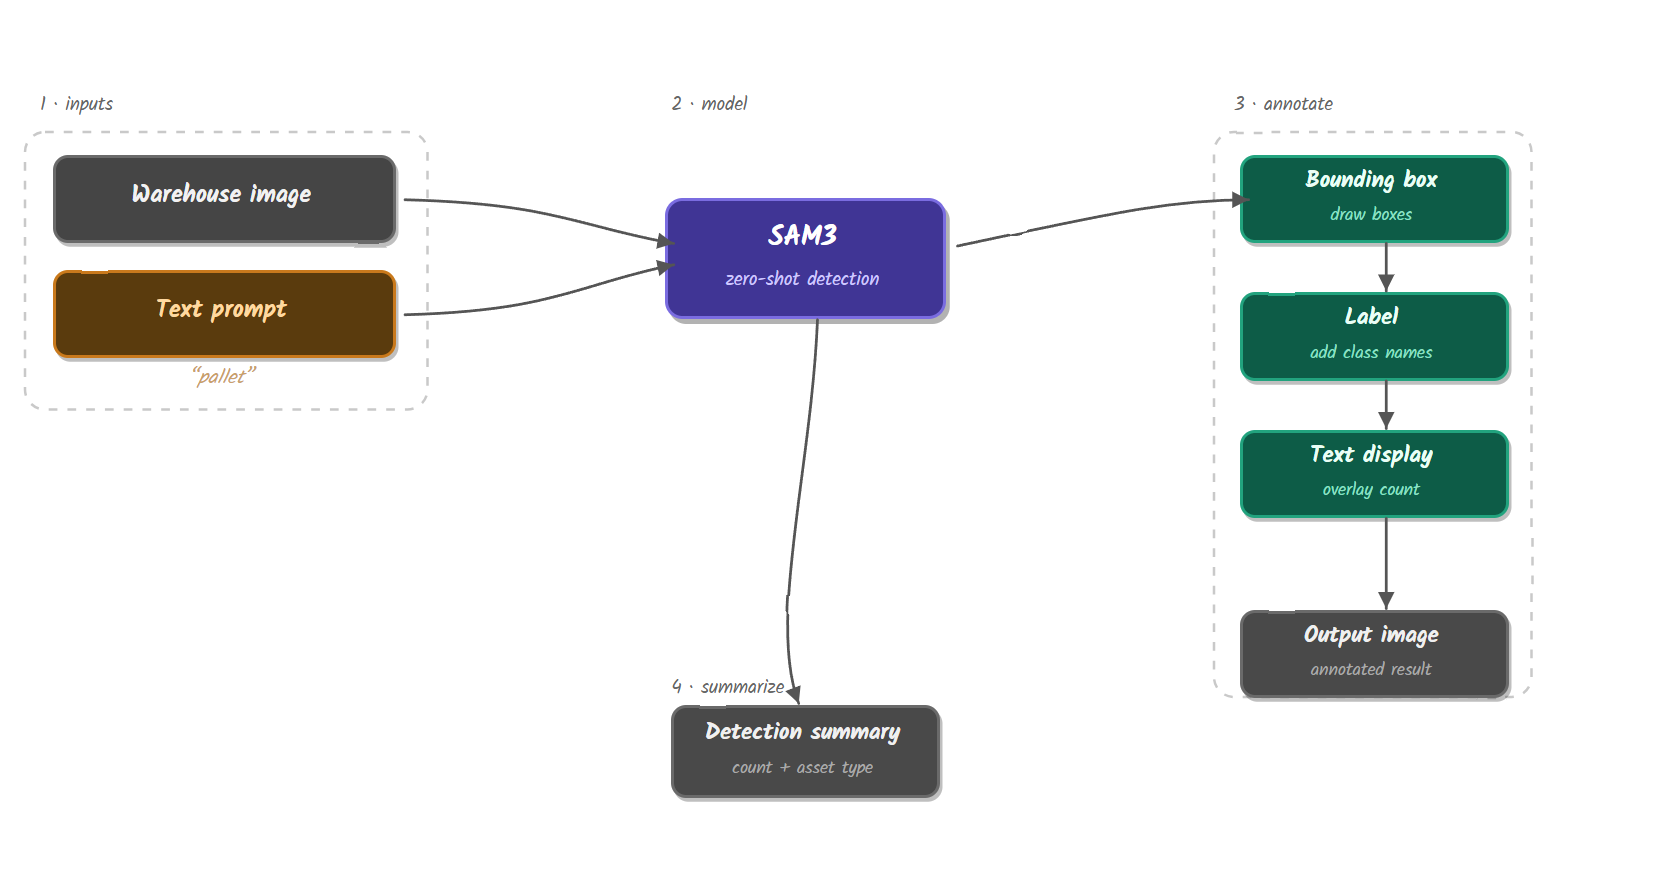
SAM3 returns a bounding box and label for each match. The results are visualized with bounding boxes, labels, and a live object count. Finally, a Custom Python block generates a clean summary showing the total number of matches and the asset types detected.
What Is a Detect Anything Model?
A detect anything model is an open-vocabulary object detection model that finds objects from a text prompt instead of a fixed, pre-trained list of classes. You describe what you want, “forklift,” “pallet,” “wire cage,” and the model returns a bounding box for every matching object, with no labeled dataset and no training run. It is also called open-vocabulary or zero-shot detection.
The difference from a traditional detector is the class list. A model like YOLO or a custom-trained RF-DETR learns a fixed set of classes from labeled examples, so adding a new object means collecting images, labeling them, and retraining. A detect anything model skips that loop: the class list is just text you pass at inference time, so a new asset is a new prompt, not a new training cycle.
| Detect anything model | Traditional detector | |
|---|---|---|
| Class list | Text prompt, set per request | Fixed, set at training time |
| Labeled data | None required | Required |
| Adding a new object | Change the prompt | Collect, label, retrain |
| Time to first result | Instant | Days |
| Precision and control | Depends on the prompt | High, tuned to your data |
| Best for | Prototyping, rare or changing objects, search | Production, fixed known classes |
The detect anything model landscape
Several models take this open-vocabulary approach, and they share one idea: describe the object, detect it, no per-class training.
- SAM3 (Segment Anything Model 3): Meta’s promptable model, which segments and detects any region matching a text or visual prompt. It is the model this tutorial uses.
- Grounding DINO: pairs a text prompt with a DETR-style detector to produce open-vocabulary bounding boxes.
- YOLO-World: brings open-vocabulary detection to real-time YOLO speeds.
- DINO-X: a unified open-world model aimed at detecting and understanding almost anything in a scene.
- DART (Detect Anything in Real Time): a training-free method that converts SAM3 into a real-time multi-class detector.
This tutorial uses SAM3 and it is available as a block in Roboflow Workflows and handles common warehouse assets well from a plain-language prompt. The tradeoff across all of these models is precision and control: results depend on how the prompt is written, so when you need consistent, high-accuracy production detection, the usual path is to use these zero-shot detections to bootstrap a labeled dataset and train a model like RF-DETR.
Build the Natural Language Warehouse Asset Search Workflow
Here’s the workflow we’ll build. The Workflow consists of the following components, each responsible for a specific task:
- Inputs: a warehouse image and an asset_prompt field for the asset name to search for
- Asset Prompt To Classes: converts the text prompt into a class list that SAM3 can consume
- SAM3: detects and segments every region in the image matching the class list
- Bounding Box Visualization: draws a box around each detection
- Property Definition: counts the total number of detections
- Clean Detections: formats the raw output into a simple summary of asset types found
- Label Visualization: adds the asset name to each box
- Text Display: overlays the search term and detection count on the image
- Outputs: returns the annotated image, the detection summary, and the total count
Step 1: Create a new Workflow in Roboflow
Create a new Workflow from the Workflows tab. An Image Input block and an Outputs block are added automatically.
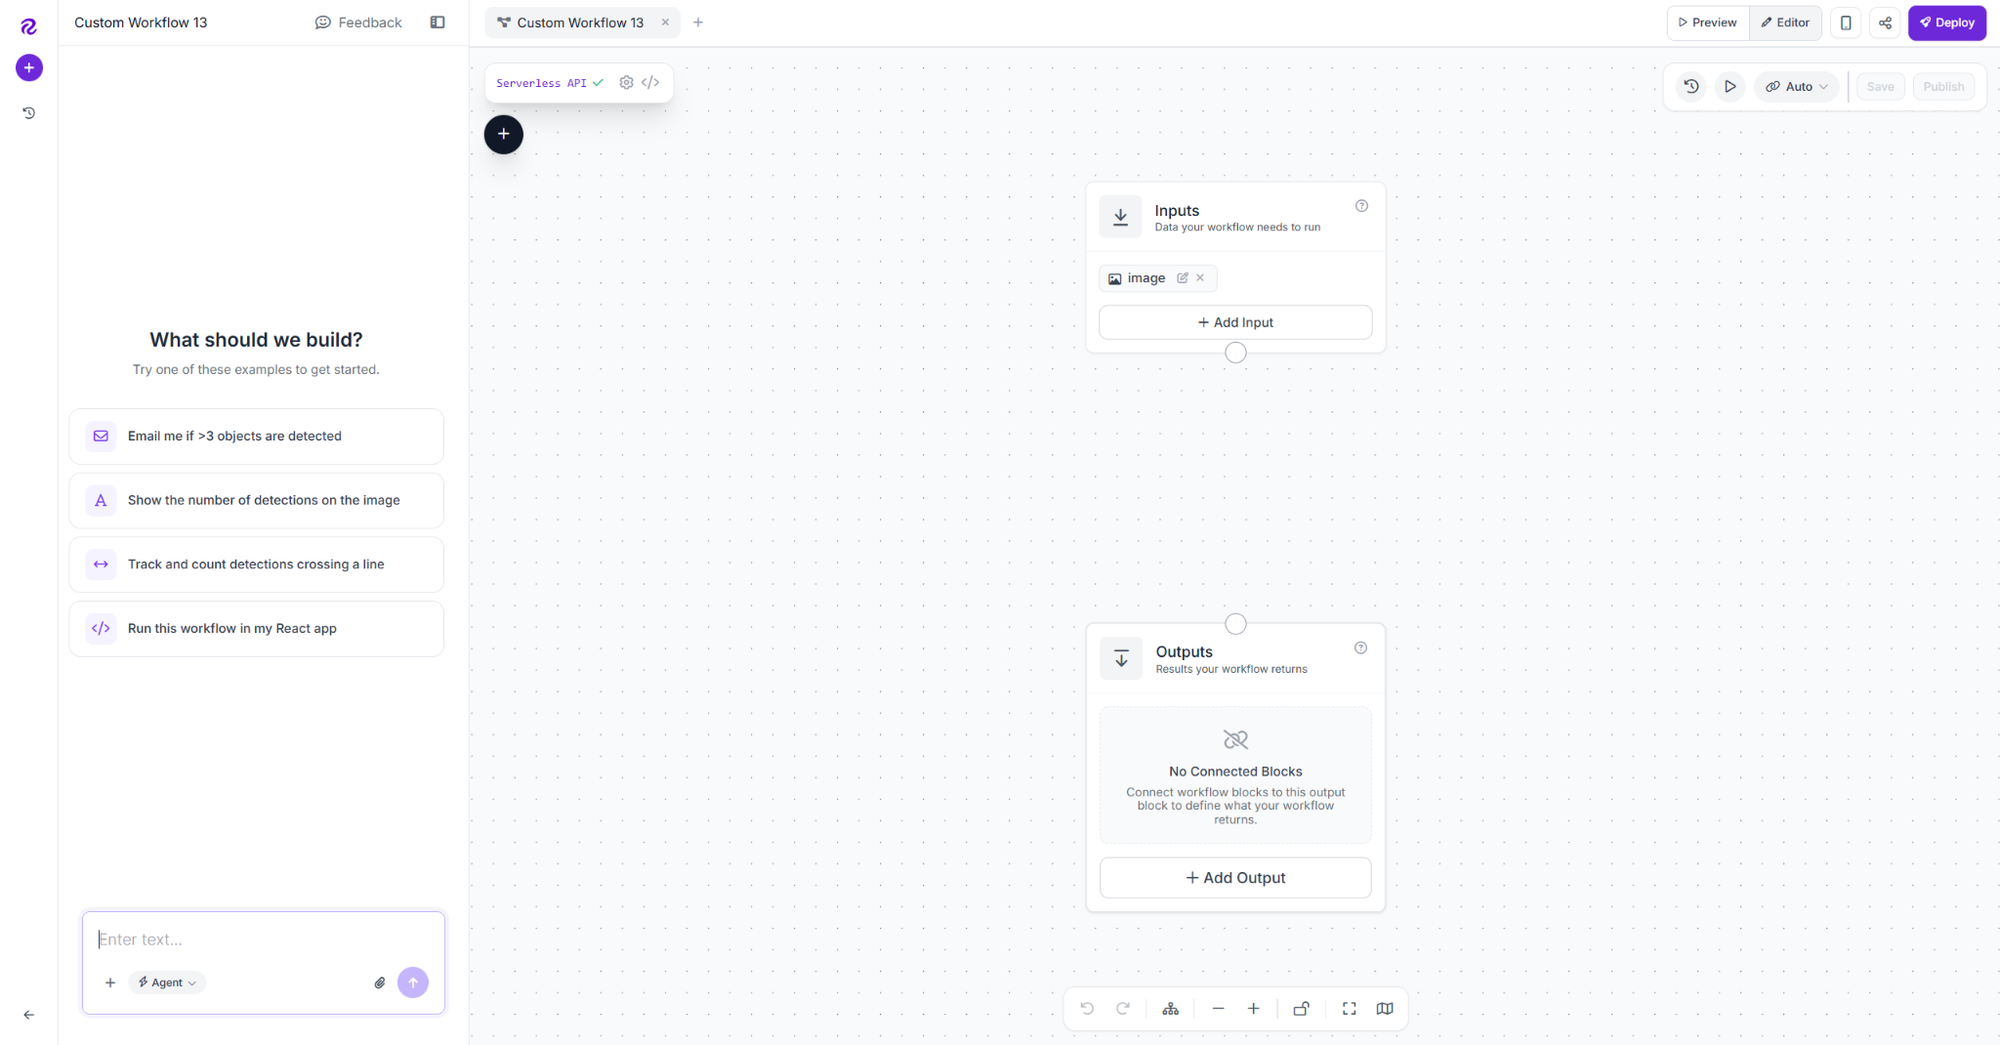
Add two inputs: image (image) and asset_prompt (string). Set the default value of asset_prompt to “pallet” so you can test the Workflow without entering a custom prompt.
Step 2: Add the Asset Prompt To Classes block
Add a Custom Python Block named asset_prompt_to_classes. Set the block type to Asset Prompt To Classes and use the description: “Convert a natural language warehouse asset prompt into a single-class list for SAM3.”
Create one input, asset_prompt (string), and one output, classes (list_of_values). Then connect inputs.asset_prompt to asset_prompt.
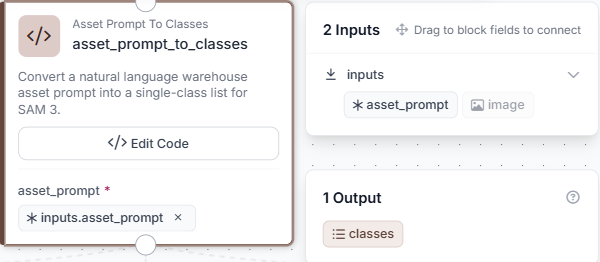
Click Edit Code to open the full editor.
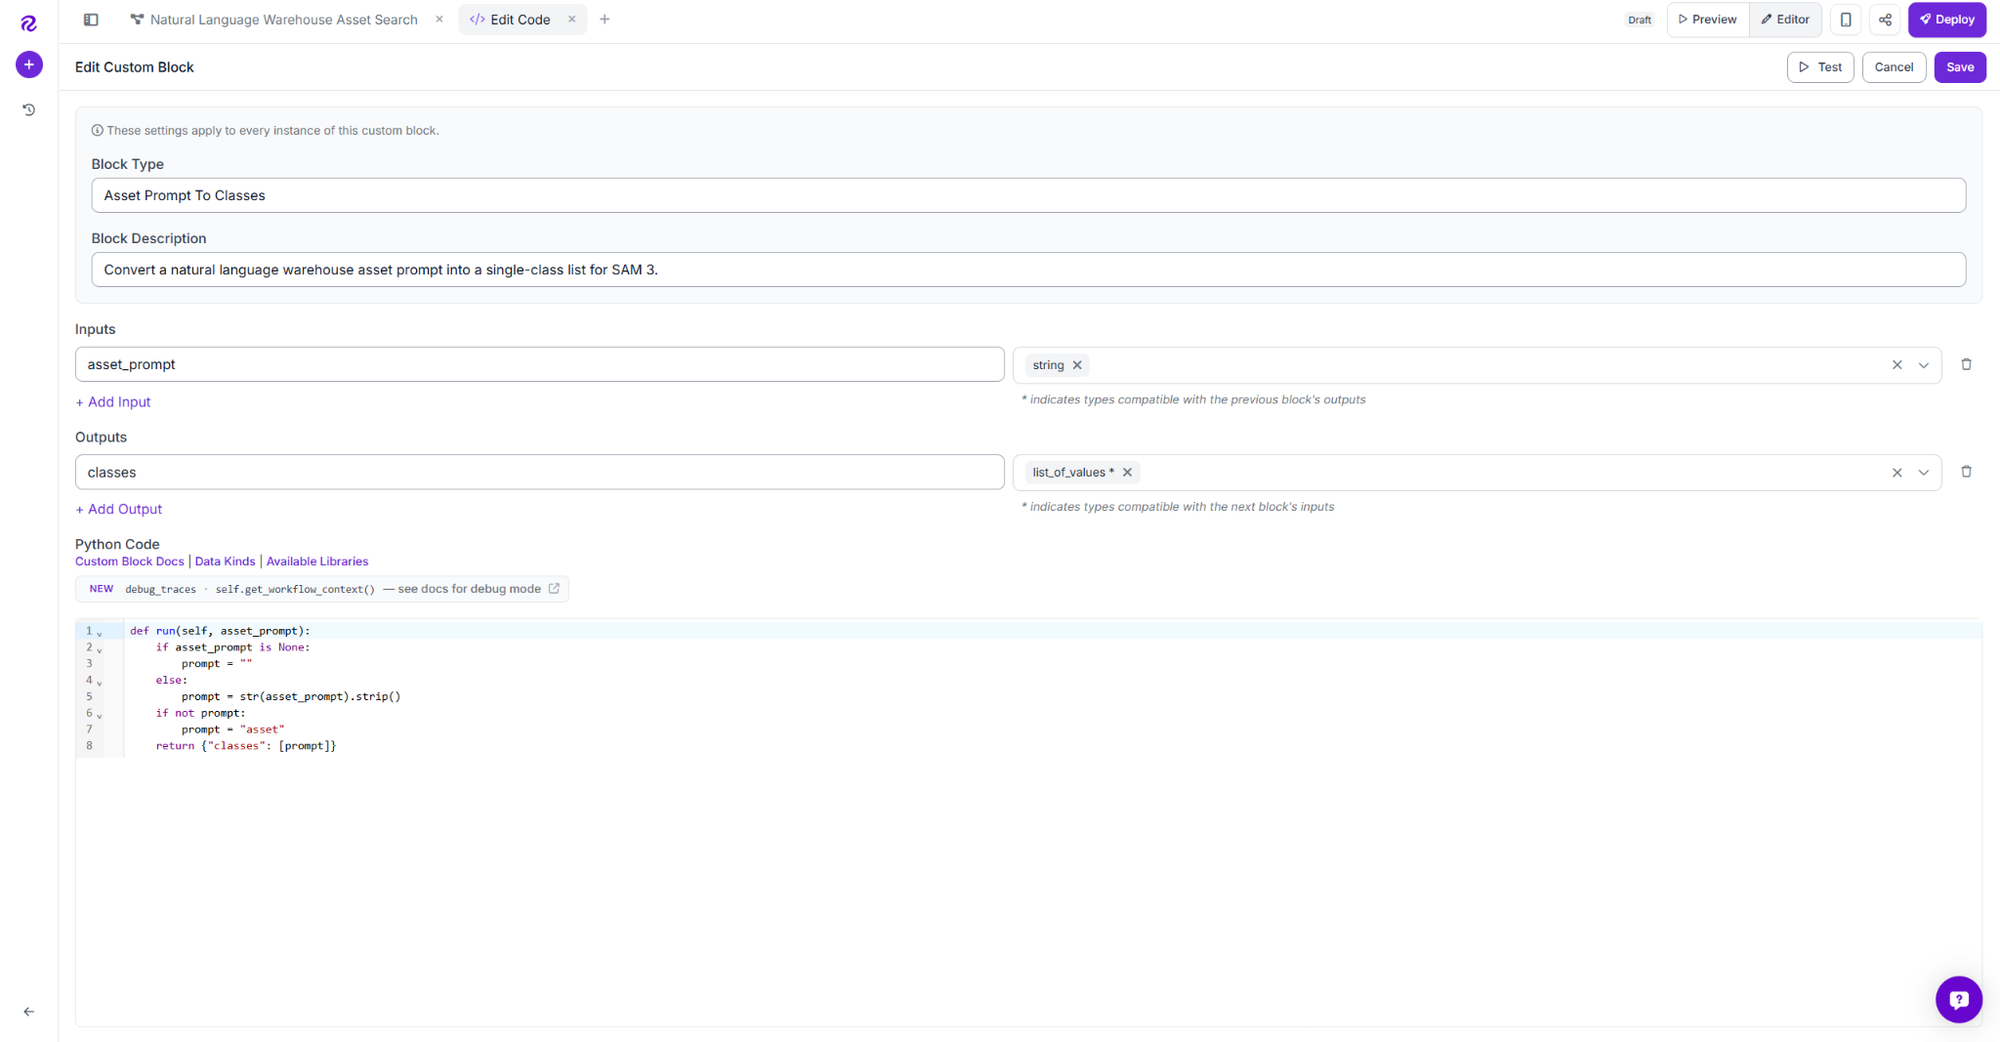
Paste the following code:
def run(self, asset_prompt):
    if asset_prompt is None:
        prompt = ""
    else:
        prompt = str(asset_prompt).strip()
    if not prompt:
        prompt = "asset"
    return {"classes": [prompt]}
This block cleans the input text, removes extra spaces, and converts it into a list for SAM3. If no prompt is provided, it defaults to “asset” to ensure the Workflow always has a valid class to run.
Step 3: Add the SAM3 block
Click the plus icon, search for SAM3, and add it as asset_detector. Connect Image to inputs.image and Class Names to asset_prompt_to_classes.classes.
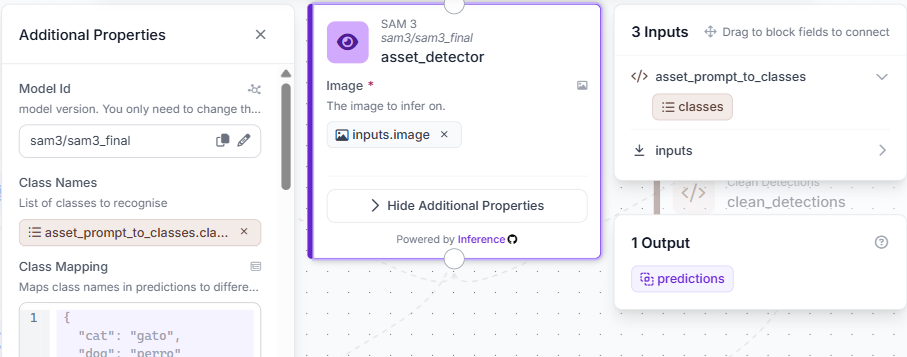
The Model ID is set to sam3/sam3_final by default, so you only need to change it if you’re using a different checkpoint. Since SAM3 runs in zero-shot mode, no training or dataset version is required. It uses the class list from the previous block as the search prompt and returns a predictions output containing a bounding box, class label, and confidence score for each match..
Step 4: Add Bounding Box Visualization
Add a Bounding Box Visualization block. Connect Input Image to inputs.image and Predictions to asset_detector.predictions.
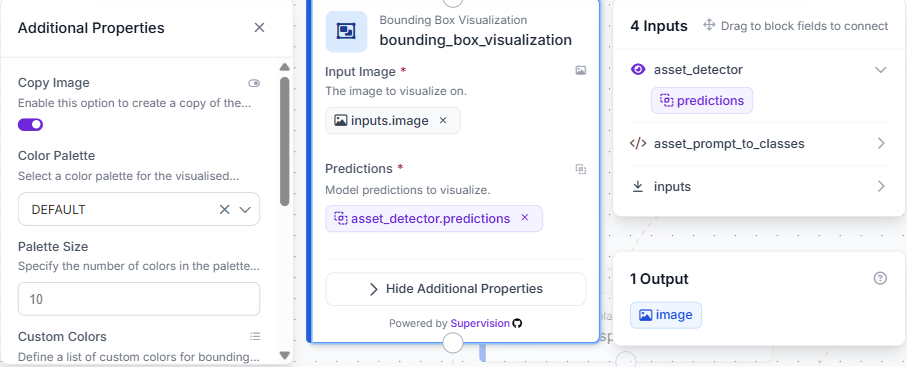
This draws a box around every region SAM3 matched to your prompt directly on the original image. The block outputs a single annotated image that gets passed to the next visualization step.
Step 5: Add Label Visualization
Add a Label Visualization block. Connect Input Image to bounding_box_visualization.image and Predictions to asset_detector.predictions. Set Text to Class.
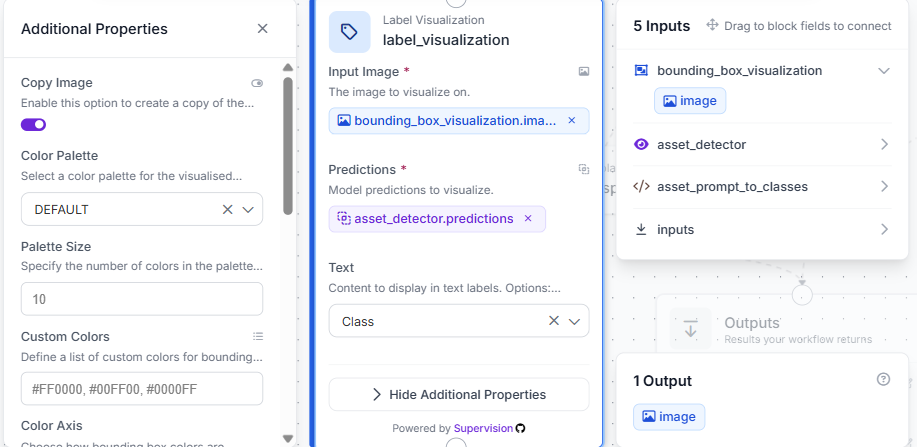
Using the image output from the previous block instead of the original input keeps the existing bounding boxes and adds the class labels on top, so both appear in the final image.
Step 6: Count detections with a Property Definition block
Add a Property Definition block named detection_count. Connect Data to asset_detector.predictions and set the operation to Count Items.
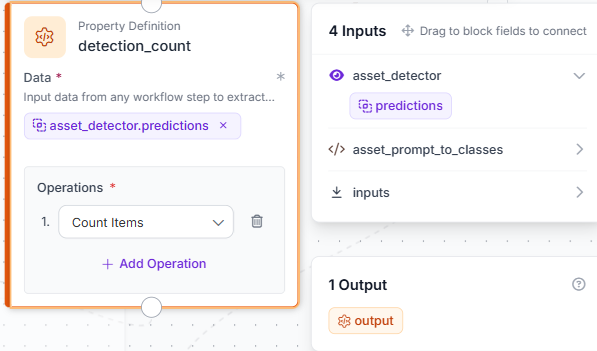
This outputs a single number representing the total count of detections SAM3 returned, which gets used later in the text overlay to show how many instances of the searched asset were found.
Step 7: Add a Text Display block
Add a Text Display block. Connect Input Image to label_visualization.image and set Text to:
Search: {{ $parameters.asset_prompt }} | Detections: {{ $parameters.count }}Set Text Parameters to:
{
  "asset_prompt": "$inputs.asset_prompt",
  "count": "$steps.detection_count.output"
}
Set Text Color to WHITE, Background Color to BLACK, and Background Opacity to 1.
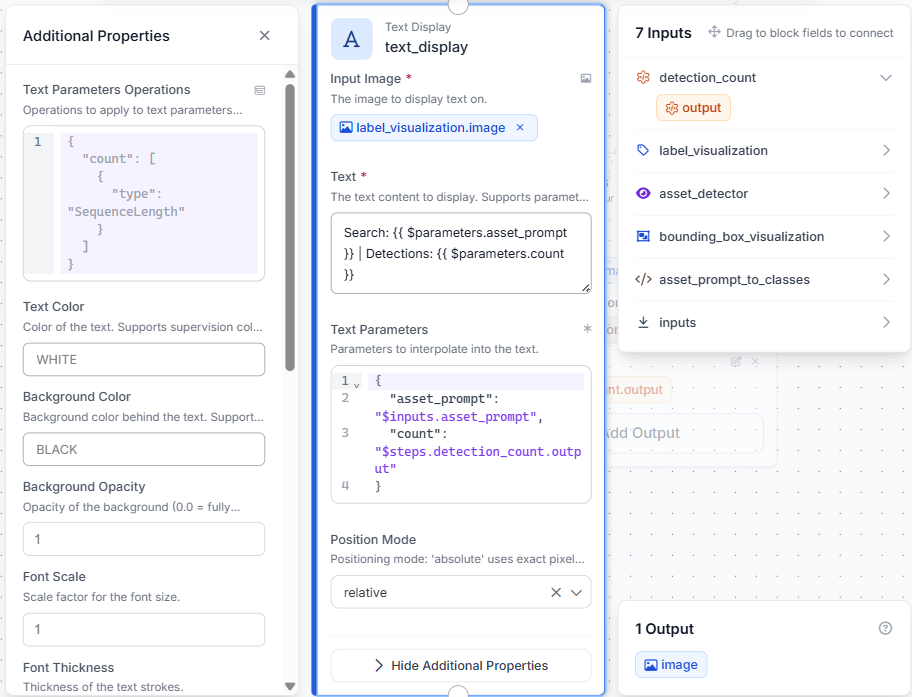
This overlays the searched asset name and the total detection count directly on the output image, so the result is self-contained and readable without needing to check the JSON separately.
Step 8: Add the Clean Detections block
Add a Custom Python Block named clean_detections. Set the Block Type to “Clean Detections” and the description to “Convert SAM3 predictions into compact detection JSON without encoded mask data.” Add one input: predictions of kind instance_segmentation_prediction and object_detection_prediction. Add one output: summary of kind dictionary. Connect predictions to asset_detector.predictions.
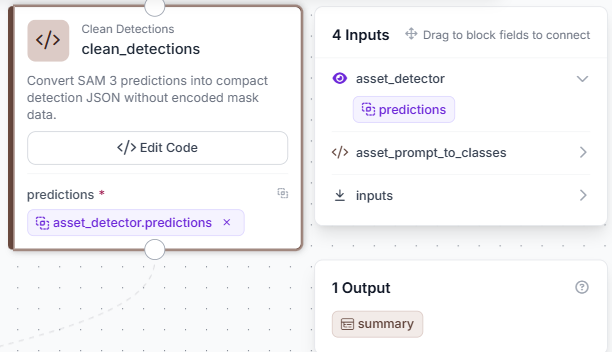
Click Edit Code to open the full editor.
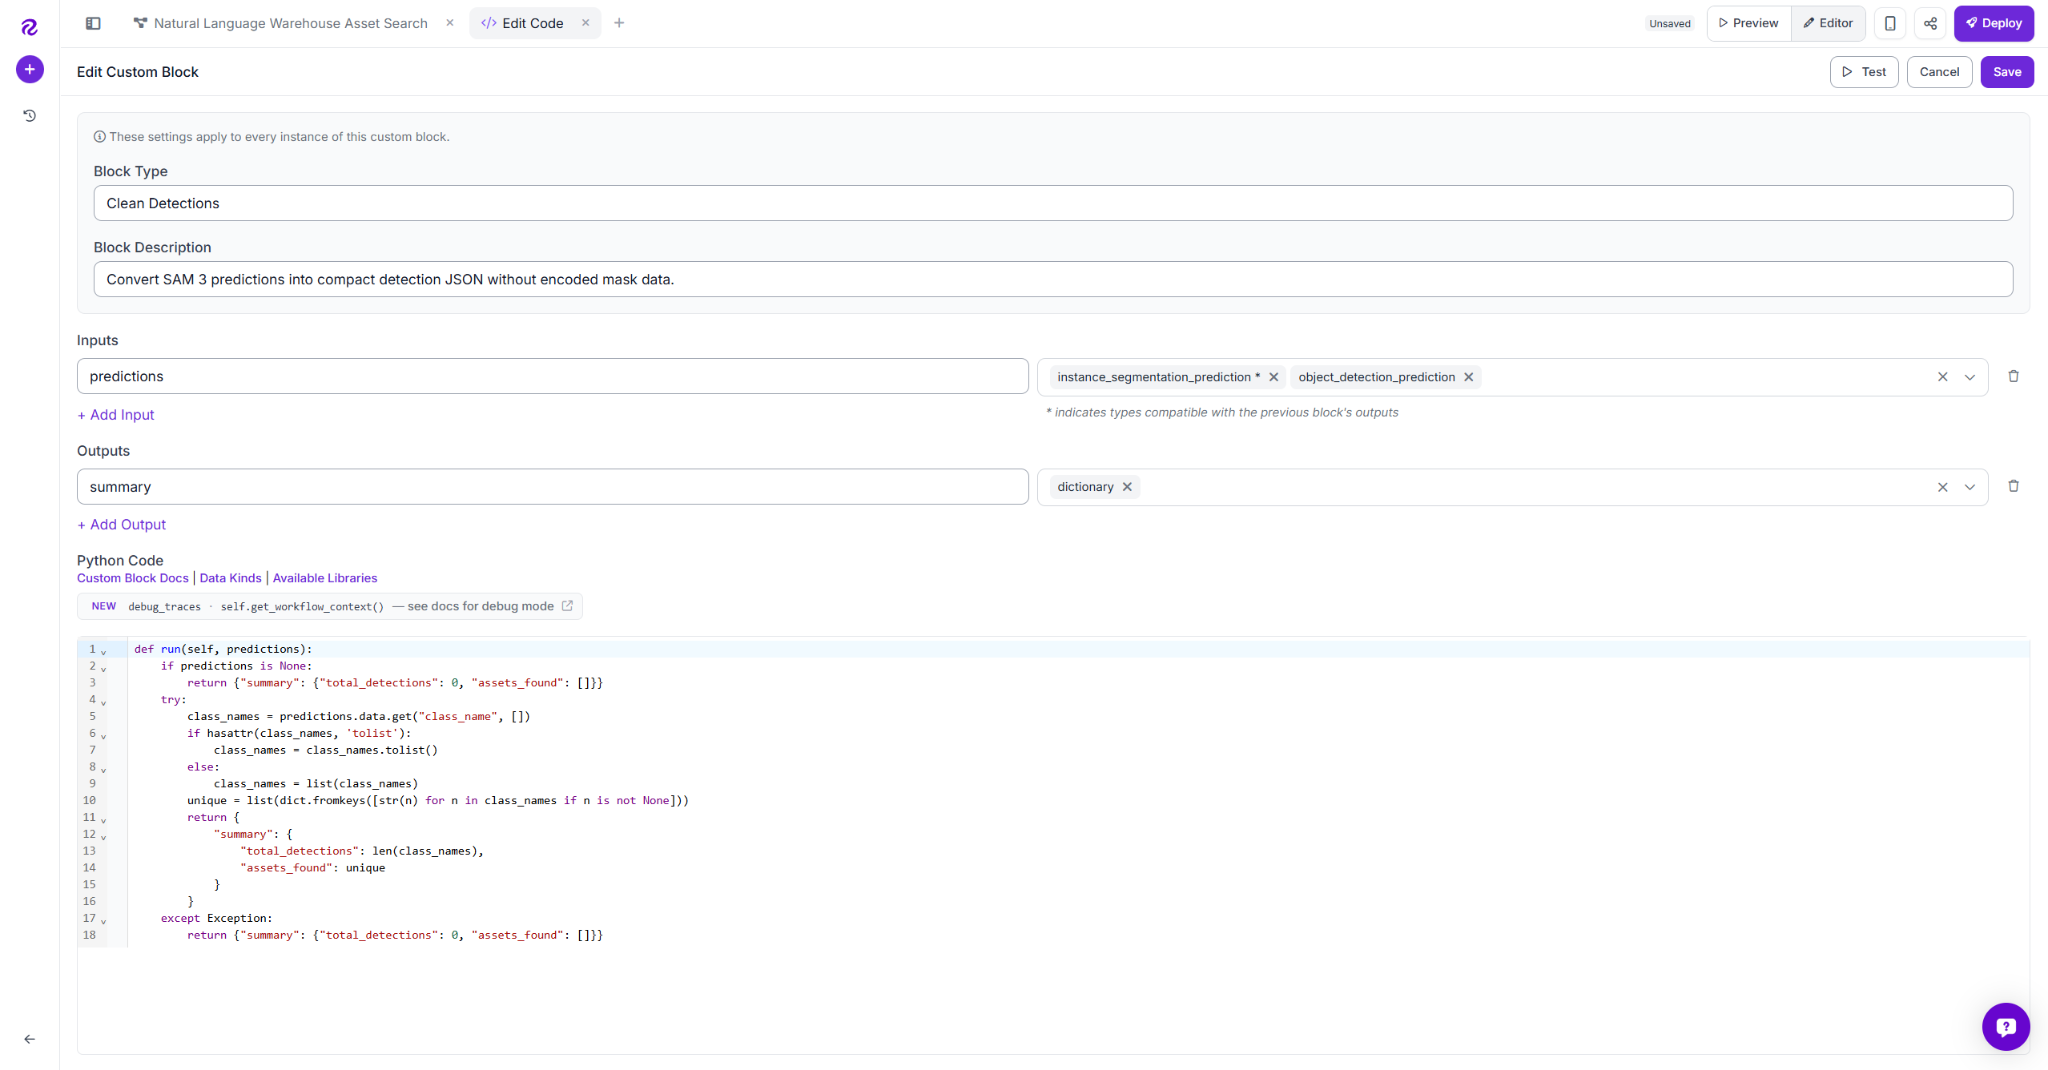
Paste the following code:
def run(self, predictions):
    if predictions is None:
        return {"summary": {"total_detections": 0, "assets_found": []}}
    try:
        class_names = predictions.data.get("class_name", [])
        if hasattr(class_names, 'tolist'):
            class_names = class_names.tolist()
        else:
            class_names = list(class_names)
        unique = list(dict.fromkeys([str(n) for n in class_names if n is not None]))
        return {
            "summary": {
                "total_detections": len(class_names),
                "assets_found": unique
            }
        }
    except Exception:
        return {"summary": {"total_detections": 0, "assets_found": []}}
This strips the raw SAM3 output down to a clean summary showing only the total detection count and the unique asset types found, removing the encoded mask data that comes with every SAM3 prediction by default.
Step 9: Configure Outputs
Set three outputs: output_image from text_display.image, raw_detections_json from clean_detections.summary, and detection_count from detection_count.output.
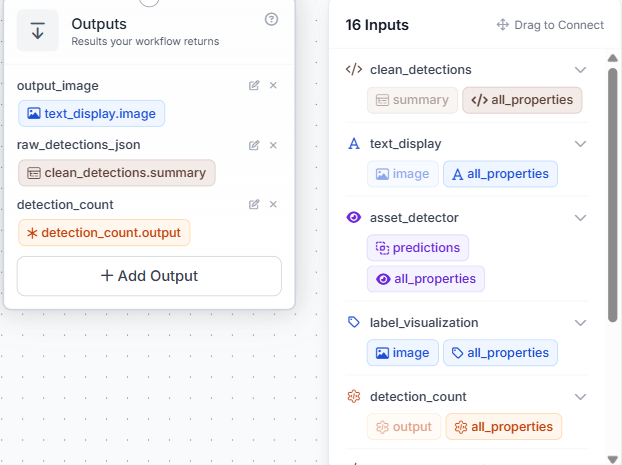
With everything connected, the full Workflow looks like this:
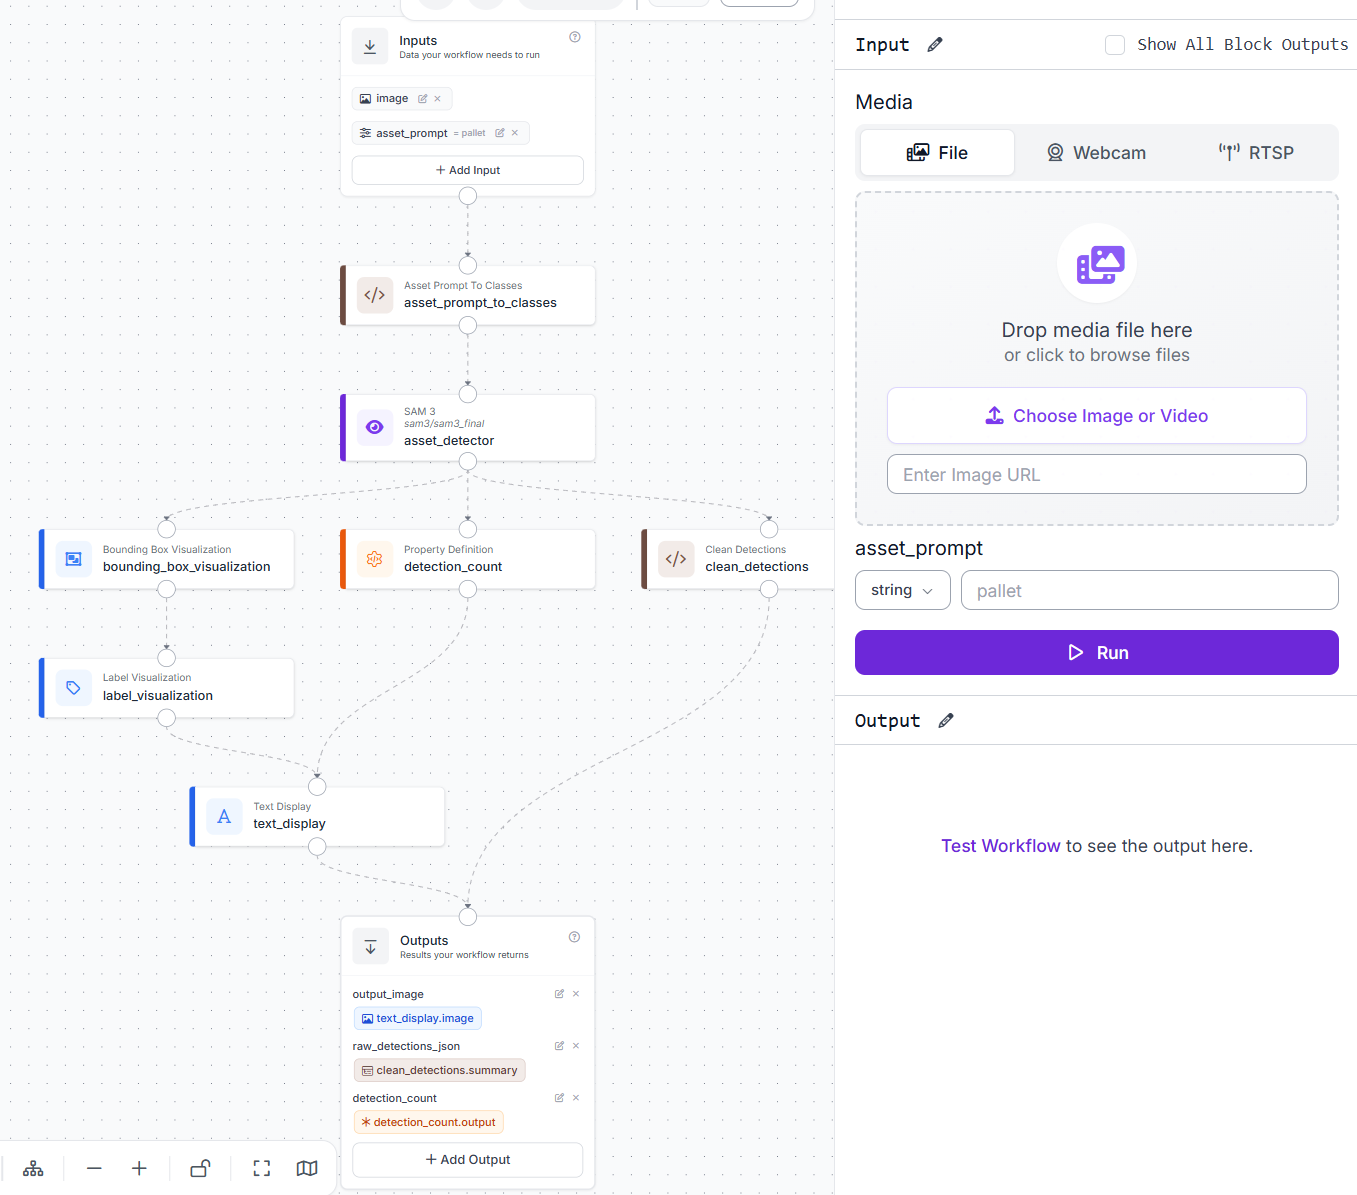
The Workflow now returns a labeled image, a clean detection summary, and the total number of matches for any asset name entered in the prompt.
Detect Anything Model Workflow Results
Test case 1: Searching for pallets across a busy scene
A warehouse floor with pallet trucks, stillages, and wire cages spread across the scene. With the prompt set to “pallet”, SAM3 returns 9 detections, all correctly located on the left side of the frame where the wooden pallets are stacked and staged. The pallet trucks, wire cages, and other equipment on the right side are ignored entirely.
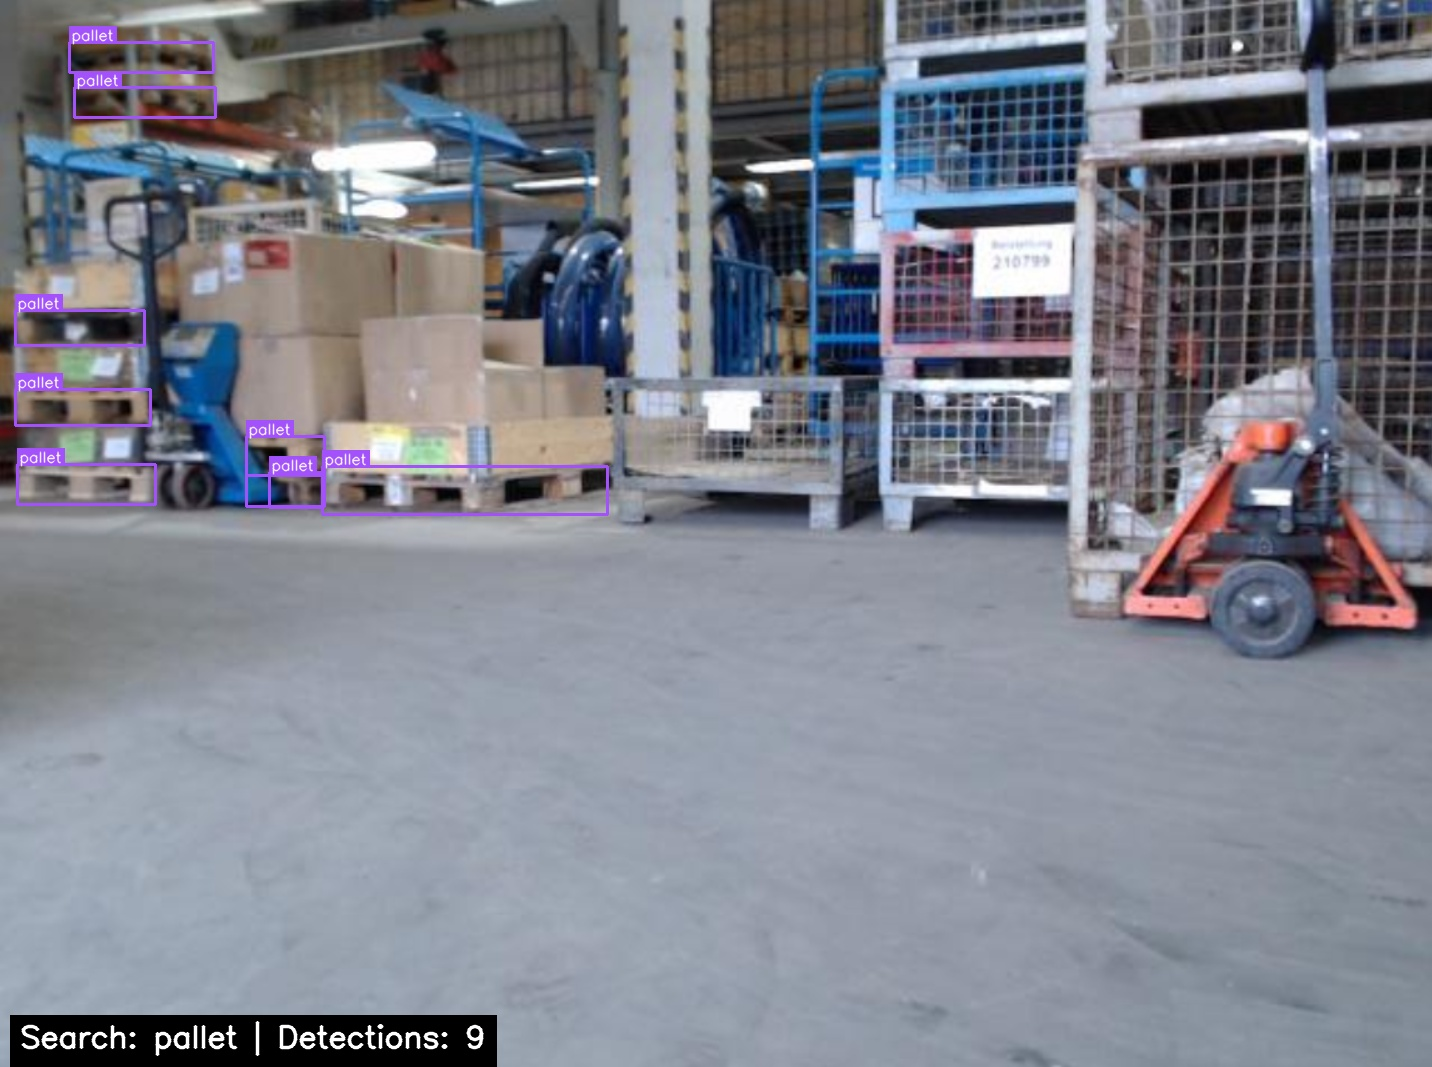
The JSON output confirms the result cleanly, returning the total count and the asset type found with no extra noise.
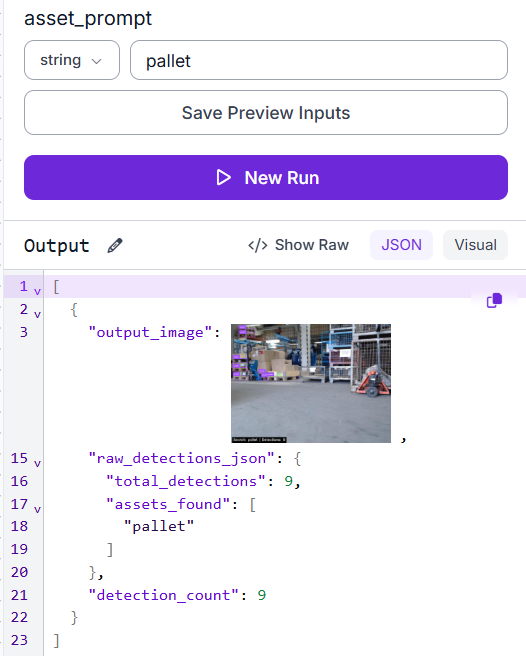
The model finds every visible pallet instance in a single pass without any labeled training data, and everything else in the scene stays untouched.
Test case 2: Same image, different prompt
The same image from the first test case is used, but this time the prompt is changed to “pallet truck.” SAM3 detects the two pallet trucks in the scene while ignoring the nine pallets it identified in the previous run.
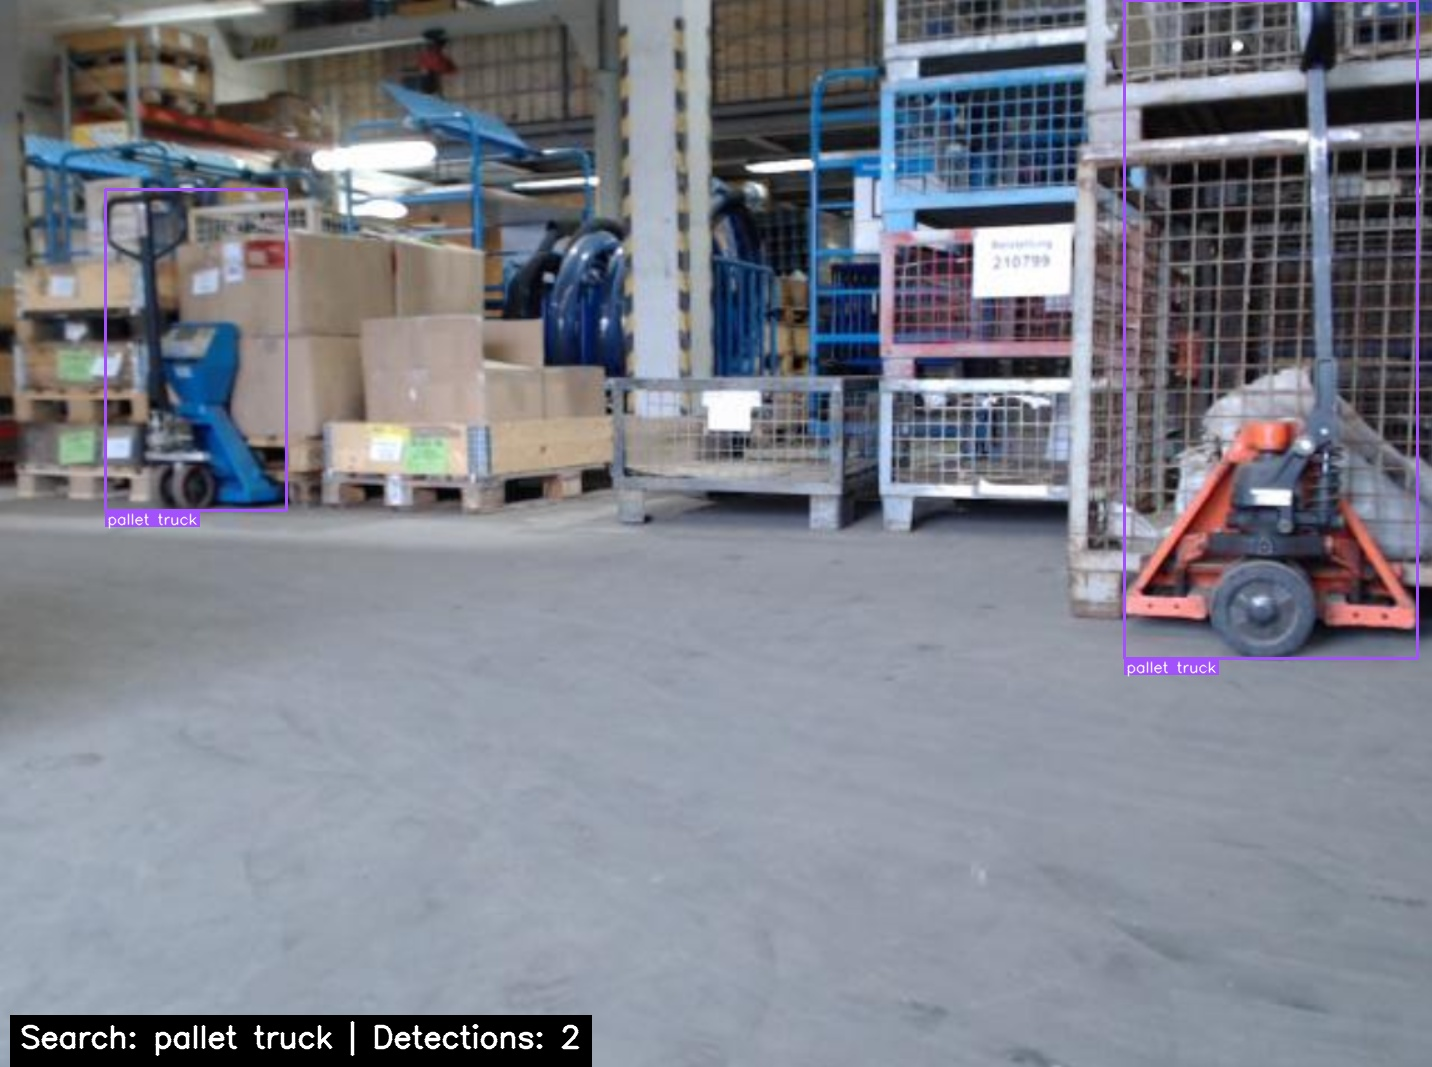
The JSON output updates instantly based on the new prompt, with no retraining or Workflow changes required.
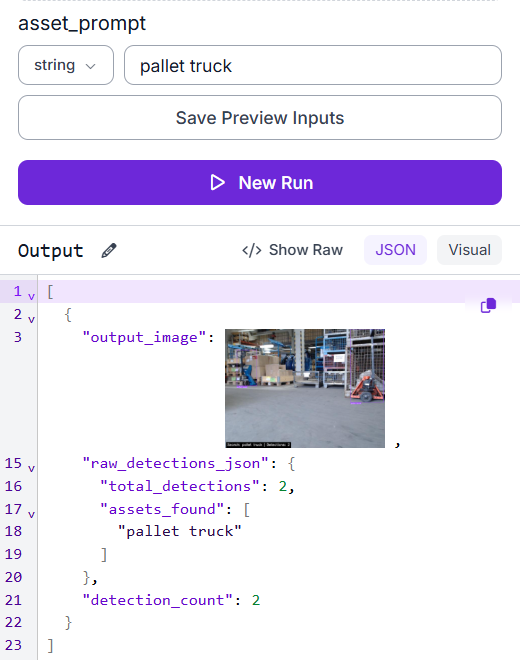
This is what makes the search engine approach so powerful. The same Workflow, image, and model can return completely different results just by changing the search prompt.
Test case 3: Locating a forklift in a different scene
A different warehouse image, an outdoor corridor along a warehouse building. The forklift is partially visible in the far right corner of the frame, small and partially out of view. With the prompt set to “forklift”, SAM3 returns 1 detection, correctly placing a box around the forklift despite its size and position in the scene.
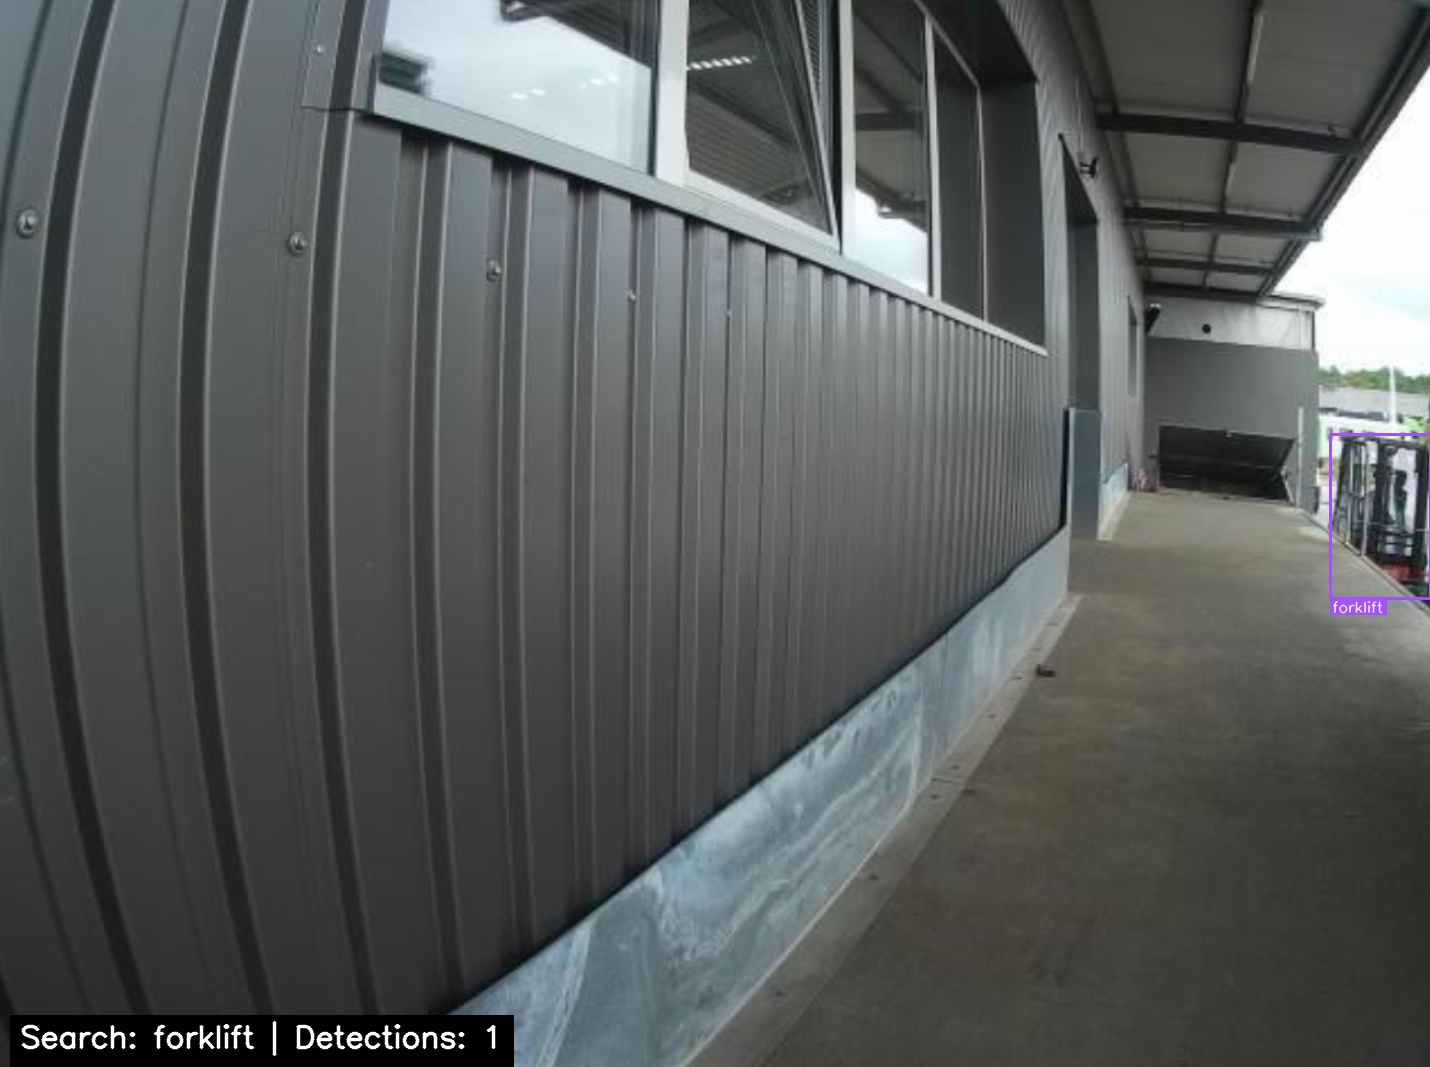
The JSON output confirms the detection.
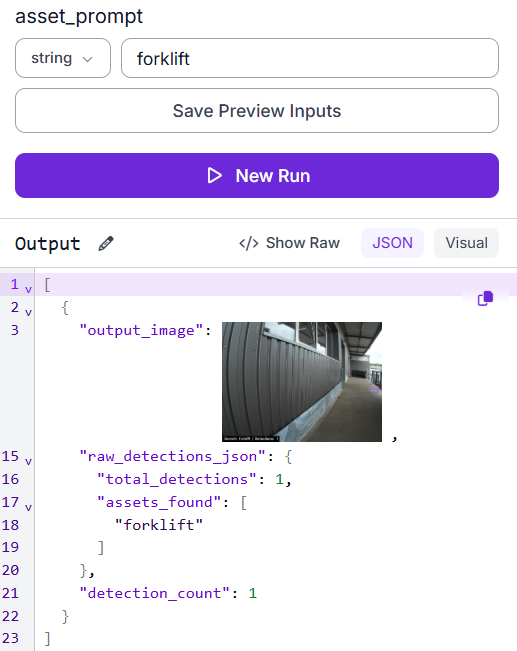
The Workflow handles a completely different scene and a different asset type without any configuration change. Only the image and the prompt are different.
Detect Anything Model Production and Deployment
Once published, the Workflow runs through the Roboflow API. You send an image and a text prompt, and it returns an annotated image plus a detection summary. Since the prompt is set per request, different users can search for different assets without changing the Workflow.
Connected to warehouse cameras, it functions as a live search system. A manager enters an asset name, the current frame is sent to the API, and the response shows where the asset is located and how many instances are present.
Keep in mind that SAM3 handles common terms like “pallet” and “forklift” well, but may struggle with more specific terms like “stillage.” If no detections appear even when the object is visible, try a clearer description such as “wire cage.”
Use Roboflow Agent
If you’d rather not add each block by hand, use Roboflow Agent. Instead of configuring blocks one at a time, you describe the pipeline you want in plain text and the Agent builds it for you. Here’s an example:
Detect Anything Model Conclusion
This Workflow takes a warehouse image and a text prompt, then returns a labeled image with every matching asset boxed and counted. It requires no labeled dataset, no model training, and no fixed class list. Simply change the prompt to search for a different asset.
The tradeoff is accuracy. Results depend on how the prompt is written, and industry-specific terms may need more descriptive wording. Point it at any warehouse scene, describe the asset you are looking for, and the results appear instantly. When the results need to get more precise, those detections become the starting point for a labeled dataset.
For teams ready to deploy a trained model, RF-DETR is designed for production workloads where fast, accurate detection, segmentation, and keypoint estimation are essential.
Further reading
How does a detect anything model work?
It pairs a text prompt with a vision model trained to align language and image features. At inference, the prompt acts as the class list, so the model locates any region that matches your description. Because the classes are supplied as text at run time, you can search for a new object just by changing the prompt.
Is SAM3 a detect anything model?
Yes. SAM3 (Segment Anything Model 3) takes a text or visual prompt and detects and segments every matching region in an image, with no training, which is exactly the detect-anything, open-vocabulary approach. This tutorial uses SAM3 as the detection engine.
What is the difference between a detect anything model and traditional object detection?
A traditional detector learns a fixed set of classes from labeled data, so adding a new class means retraining. A detect anything model takes the class list as a text prompt at inference time, so it needs no labeled data and a new object is just a new prompt. The tradeoff is that a trained model is usually more precise and consistent on its known classes.
What is the difference between detect anything and segment anything?
Detecting returns a bounding box around each matching object; segmenting returns a pixel-level mask of its exact shape. SAM3 does both from the same prompt. This tutorial uses the detection (bounding box) output to build the asset search.
When should you use a detect anything model instead of a trained model?
Use it for prototyping, for rare or frequently changing objects, and for search-style tasks where you want results instantly without labeling. When you need high, consistent precision in production, use the zero-shot detections to build a labeled dataset and train a model like RF-DETR.