How to Use GitHub
When you work on a local Python project, tracking your changes with Git is a great way to maintain a history of your code. However, keeping your repository only on your computer leaves your work vulnerable to hardware failures and makes collaboration difficult. By learning how to use GitHub, you can back up your work, share your code with the public, and work alongside other developers.
By following this guide, you’ll learn how to create a GitHub repository, connect it to your local project, and collaborate with others online.
Here’s a preview of what a successfully connected and active GitHub repository looks like:
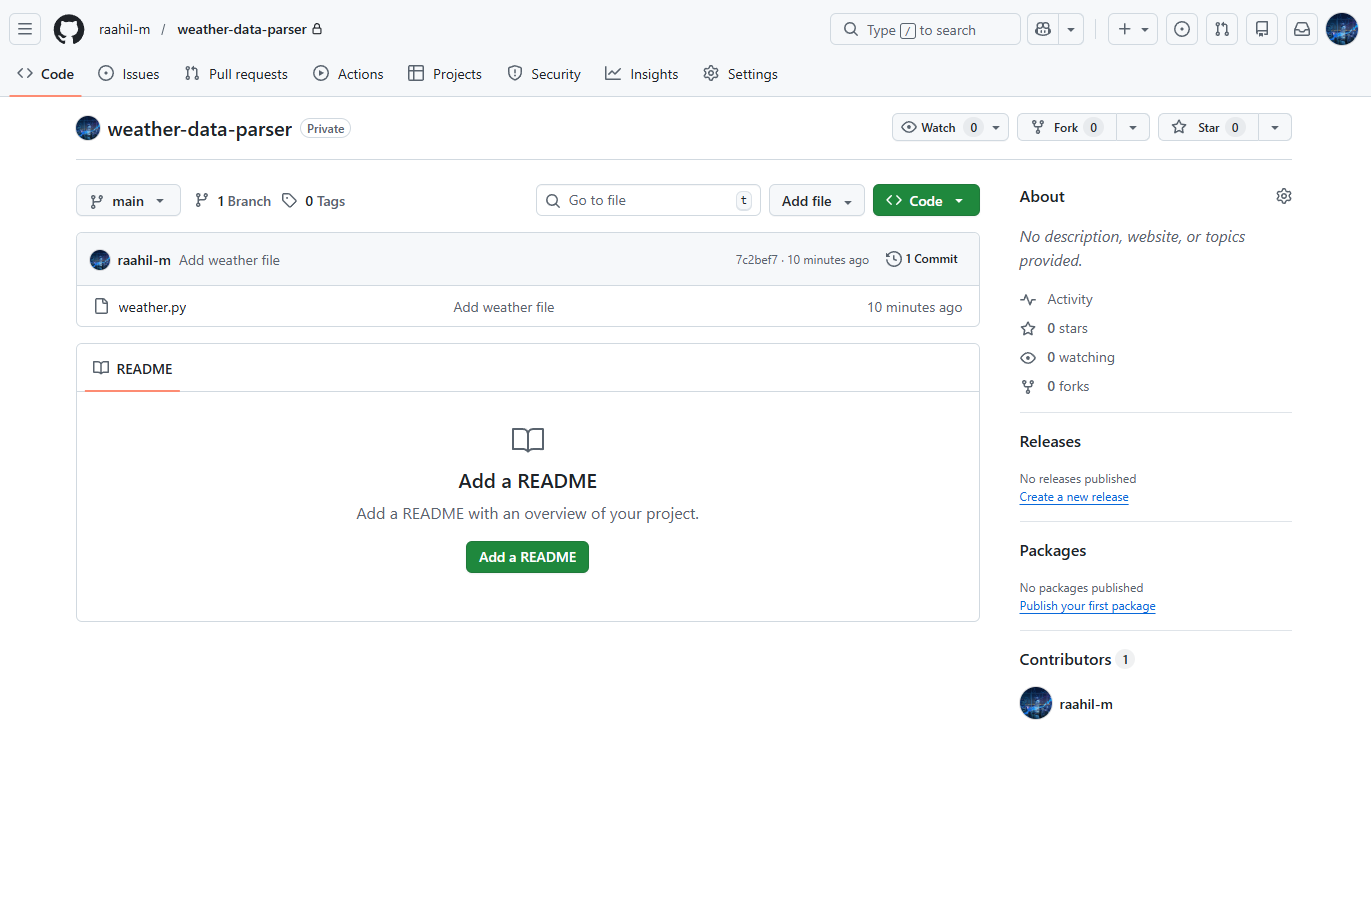
The screenshot above is your destination. In the rest of this tutorial, you’ll build that result one step at a time, starting from your local project.
Get Your Code: Click here to download the free sample code you’ll use to follow along as you put a weather CLI app on GitHub and practice core workflows like commits, branches, pull requests, and issues.
Take the Quiz: Test your knowledge with our interactive “How to Use GitHub” quiz. You’ll receive a score upon completion to help you track your learning progress:
Interactive Quiz
Practice putting a Python project on GitHub by creating a remote repository, pushing your local code, and collaborating with others.
Prerequisites
This guide is designed for developers who already have a basic understanding of the command line and local version control. To follow along with the steps, you’ll need:
- A GitHub account: A free account registered on GitHub.
- Git installed: The Git command-line tools installed on your operating system.
- A local Git repository: A folder on your computer that contains some files and has been initialized with
git init. You should also have at least one saved commit in this local repository.
If you need help setting up your local environment before moving forward, you can review the How to Use Git: A Beginner’s Guide tutorial to get your local repository ready.
If you prefer to learn by watching, Real Python’s Introduction to Git and GitHub for Python video course walks through both tools from the ground up and pairs well with the hands-on steps in this guide.
To work through the steps that follow, you can set up a sample Python project locally. Open your terminal, create a new folder called weather-data-parser, and navigate inside it:
$ mkdir weather-data-parser
$ cd weather-data-parser
Create a new file named weather.py and paste the Python code below into it. This weather app is adapted from Real Python’s Raining Outside? Build a Weather CLI App With Python tutorial, which provides additional background and a full step-by-step walkthrough of the original project.
Filename:
weather.py
import argparse
import json
import sys
from configparser import ConfigParser
from urllib import error, parse, request

# =========================
# Styling / Colors
# =========================
PADDING = 20
RED = "\033[1;31m"
BLUE = "\033[1;34m"
CYAN = "\033[1;36m"
GREEN = "\033[0;32m"
YELLOW = "\033[33m"
WHITE = "\033[37m"
REVERSE = "\033[;7m"
RESET = "\033[0m"

def change_color(color):
    print(color, end="")

# =========================
# Weather Config
# =========================
BASE_WEATHER_API_URL = "
# Weather Condition Codes
#
THUNDERSTORM = range(200, 300)
DRIZZLE = range(300, 400)
RAIN = range(500, 600)
SNOW = range(600, 700)
ATMOSPHERE = range(700, 800)
CLEAR = range(800, 801)
CLOUDY = range(801, 900)

def read_user_cli_args():
    """Handles the CLI user interactions.

    Returns:
        argparse.Namespace: Populated namespace object
    """
    parser = argparse.ArgumentParser(
        description="gets weather and temperature information for a city"
    )
    parser.add_argument(
        "city", nargs="+", type=str, help="enter the city name"
    )
    parser.add_argument(
        "-i",
        "--imperial",
        action="store_true",
        help="display the temperature in imperial units",
    )
    return parser.parse_args()

def build_weather_query(city_input, imperial=False):
    """Builds the URL for an API request to OpenWeather's Weather API.

    Args:
        city_input (List[str]): Name of a city as collected by argparse
        imperial (bool): Whether or not to use imperial units for temperature

    Returns:
        str: URL formatted for a call to OpenWeather's city name endpoint
    """
    api_key = _get_api_key()
    city_name = " ".join(city_input)
    url_encoded_city_name = parse.quote_plus(city_name)
    units = "imperial" if imperial else "metric"
    url = (
        f"{BASE_WEATHER_API_URL}?q={url_encoded_city_name}"
        f"&units={units}&appid={api_key}"
    )
    return url

def _get_api_key():
    """Fetch the API key from your configuration file.

    Expects a configuration file named "secrets.ini" with structure:

        [openweather]
        api_key=<YOUR-OPENWEATHER-API-KEY>
    """
    config = ConfigParser()
    config.read("secrets.ini")
    return config["openweather"]["api_key"]

def get_weather_data(query_url):
    """Makes an API request to a URL and returns the data as a Python object.

    Args:
        query_url (str): URL formatted for OpenWeather's city name endpoint

    Returns:
        dict: Weather information for a specific city
    """
    try:
        response = request.urlopen(query_url)
    except error.HTTPError as http_error:
        if http_error.code == 401:  # 401 - Unauthorized
            sys.exit("Access denied. Check your API key.")
        elif http_error.code == 404:  # 404 - Not Found
            sys.exit("Can't find weather data for this city.")
        else:
            sys.exit(f"Something went wrong... ({http_error.code})")
    data = response.read()
    try:
        return json.loads(data)
    except json.JSONDecodeError:
        sys.exit("Couldn't read the server response.")

def display_weather_info(weather_data, imperial=False):
    """Prints formatted weather information about a city.

    Args:
        weather_data (dict): API response from OpenWeather by city name
        imperial (bool): Whether or not to use imperial units for temperature

    More information at
    """
    city = weather_data["name"]
    weather_id = weather_data["weather"][0]["id"]
    weather_description = weather_data["weather"][0]["description"]
    temperature = weather_data["main"]["temp"]
    change_color(REVERSE)
    print(f"{city:^{PADDING}}", end="")
    change_color(RESET)
    weather_symbol, color = _select_weather_display_params(weather_id)
    change_color(color)
    print(f"\t{weather_symbol}", end=" ")
    print(
        f"\t{weather_description.capitalize():^{PADDING}}",
        end=" ",
    )
    change_color(RESET)
    print(f"({temperature}°{'F' if imperial else 'C'})")

def _select_weather_display_params(weather_id):
    """Selects a weather symbol and a display color for a weather state.

    Args:
        weather_id (int): Weather condition code from the OpenWeather API

    Returns:
        tuple[str]: Contains a weather symbol and a display color
    """
    if weather_id in THUNDERSTORM:
        display_params = ("💥", RED)
    elif weather_id in DRIZZLE:
        display_params = ("💧", CYAN)
    elif weather_id in RAIN:
        display_params = ("💦", BLUE)
    elif weather_id in SNOW:
        display_params = ("⛄️", WHITE)
    elif weather_id in ATMOSPHERE:
        display_params = ("🌀", BLUE)
    elif weather_id in CLEAR:
        display_params = ("🔆", YELLOW)
    elif weather_id in CLOUDY:
        display_params = ("💨", WHITE)
    else:  # In case the API adds new weather codes
        display_params = ("🌈", RESET)
    return display_params

if __name__ == "__main__":
    user_args = read_user_cli_args()
    query_url = build_weather_query(user_args.city, user_args.imperial)
    weather_data = get_weather_data(query_url)
    display_weather_info(weather_data, user_args.imperial)
Because this is a Python project, it’s best practice to include a .gitignore file to avoid accidentally uploading sensitive information like API keys or unnecessary files like __pycache__ directories to GitHub. Create a file named .gitignore and add the following lines:
Filename:
.gitignore
__pycache__/
secrets.ini
Now initialize the Git repository:
$ git init
Before making your first commit, it’s often helpful to check what files Git is tracking and what changes will be included. You can do this with the git status command:
$ git status
This command shows the current state of your working directory, including any new or modified files that will be part of the next commit. At this point, you should see your project files, including weather.py and .gitignore, listed as untracked files:
Filename:
Output
On branch master

No commits yet

Untracked files:
  (use "git add <file>..." to include in what will be committed)
        .gitignore
        weather.py

nothing added to commit but untracked files present (use "git add" to track)
You can now stage your files and create the initial commit:
Read the full article at »
[ Improve Your Python With 🐍 Python Tricks 💌 – Get a short & sweet Python Trick delivered to your inbox every couple of days. >> Click here to learn more and see examples ]